Disclaimer: This post assumes that the reader has basic programming skills and some Windows and USB knowledge.
After the relative success of my last USB hacking (see Xbox BigButton Project) I wanted to tackle a more ambitious USB project.
A few years ago I bought a Corsair K95 Vengeance mechanical keyboard. This keyboard has LED backlighting and I have been keen on accessing this functionality through an API. Unfortunately this keyboard does not come with any public API nor any documentation. The new K95 RGB keyboard does however via the Corsair CUE SDK, but it is not compatible with the older K95 models, see forums as well).
The keyboard contains a custom driver install and a slightly cumbersome configuration application.
I've been trying on-and-off for the last two years to access the device but have had no luck using the hid and other usb kernel functions unfortunately.
The final product
This demo was produced by installing my custom driver and running the following code:
K95Device usb = new K95Device();
try
{
    usb.Connect();

    var[] ledbrightness = {LedBrightness.Off, LedBrightness.Low, LedBrightness.Medium,
                           LedBrightness.High, LedBrightness.Medium, LedBrightness.Low };

    // Now cycle through the brightness intensities for the keyboard

    for ( int i = 0; i < 10000; i++)
    {
        usb.SetLedBrightness(ledbrightness[i % ledbrightness.Length]);

        // Short wait to let the hardware get ready again and the user to notice the change

        Thread.Sleep(150);
    }
}
catch (Exception ex)
{
    Console.WriteLine(ex.ToString());
    usb.Disconnect();
}
The device USB structure
The keyboard presents itself as a composite device with three different sub components (MI_00, MI_01, MI_02). The image below shows a screenshot of the components. The MI_02 component is the HID compliant keyboard (so that you can plug it into any computer and it works) this should be left alone.
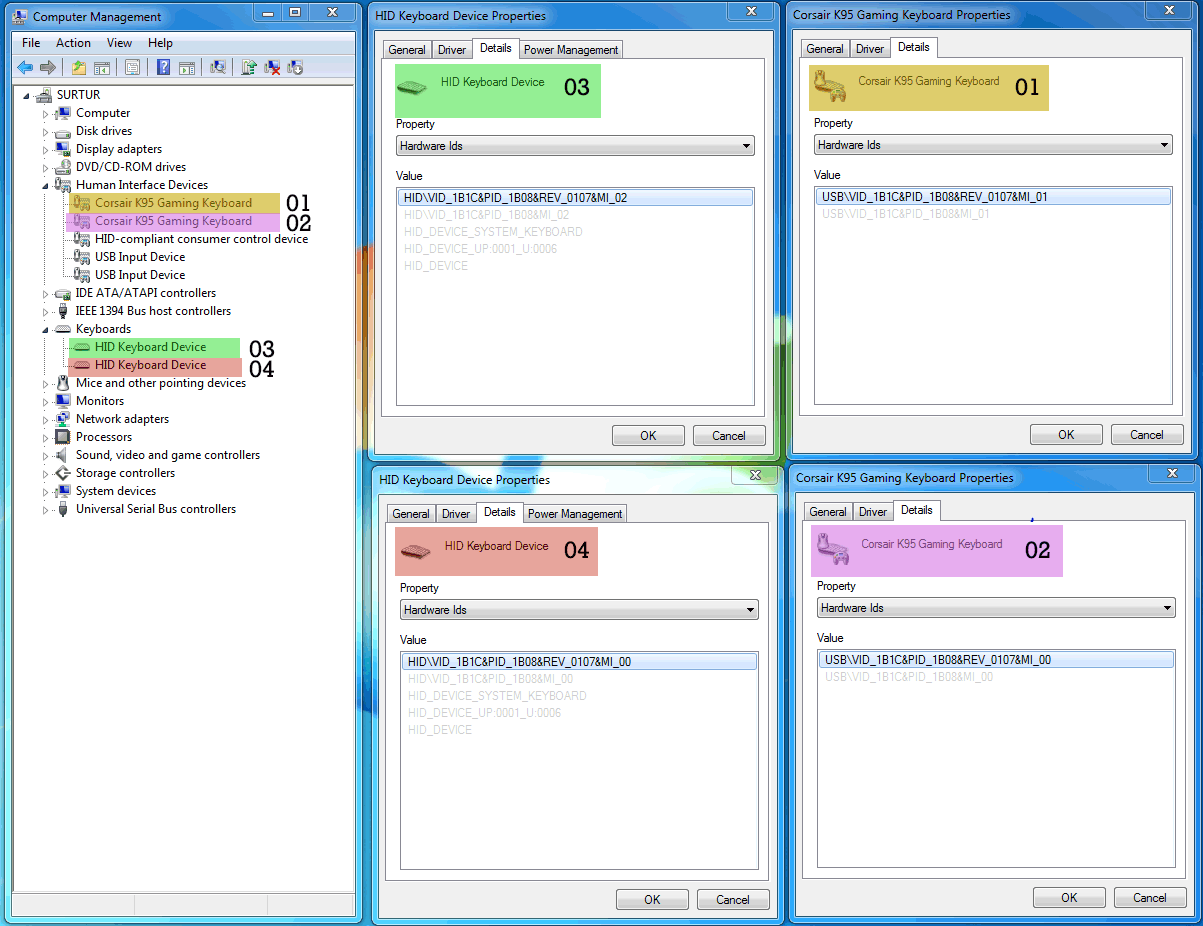
The individual components of the USB composite device
I am still not completely sure why the
MI_00component registers itself both as a Custom driver and a HID Keyboard device.
The WinUSB driver config
The WinUSB configuration is pretty standard apart from the place where the sub components are registered. Here I use the full hardware id value from the device to individually register each component. We omit the MI_02 device completely and leave it to Windows to handle installing the default keyboard USB driver for it.
[MyWinUSBDevice.NTx86]
%DeviceName0%=USB_Install, USB\VID_1B1C&PID_1B08&MI_00
%DeviceName1%=USB_Install, USB\VID_1B1C&PID_1B08&MI_01
; Don't register interface 2 as it is the hid device for the keyboard, let Windows install the default for that

;%DeviceName2%=USB_Install, USB\VID_1B1C&PID_1B08&MI_02

[MyWinUSBDevice.NTamd64]
%DeviceName0%=USB_Install, USB\VID_1B1C&PID_1B08&MI_00
%DeviceName1%=USB_Install, USB\VID_1B1C&PID_1B08&MI_01
; Don't register interface 2 as it is the hid device for the keyboard, let Windows install the default for that

;%DeviceName2%=USB_Install, USB\VID_1B1C&PID_1B08&MI_02

...

DeviceName0="Corsair K95 Gaming Keyboard Driver (Custom M0)"
DeviceName1="Corsair K95 Gaming Keyboard Driver (Custom M1)"
; Don't register interface 2 as it is the hid device for the keyboard, let Windows install the default for that

;DeviceName2="Corsair K95 Gaming Keyboard Driver (Custom M2)"
To better distinguish between the different components I give them unique suffix (Custom Mx), this makes it easier to identify what component is loaded in the device manager.
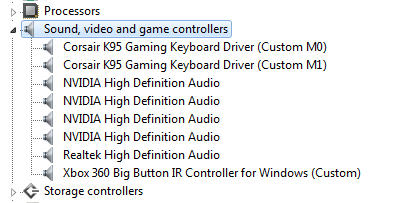
The custom driver loaded in Device Manager
To install the custom driver simply right-click on the device in the device manager and open the properties window. From there click "Update Driver" and choose the install location of your custom driver.
The USB protocol
Luckily using WinUSB to listen to the messages coming from the keyboard is a breeze and simply starting a regular background thread listening on the InPipe for each interface is enough to start receiving data. The keycodes are trivial to decipher with a little testing and are always presented in the third byte of the response (rest of the bytes are always zero).
Device roles
By simple experimentation I was able to deduced the following:
Device MI_00 is used for LED control buttons and programming gamer keys, memory buttons (MR), windows lock key and the caps/scroll/num lock button states.
Device MI_01 is used to get notified when Volume control roller and media function keys on the keyboard are interacted with (play, pause etc).
Device MI_02 is used for keyboard functions. If this device is included in the WinUSB drivers then the entire keyboard will stop working. Best to leave this alone.
Communication (computer to keyboard)
The most challenging aspect of this project was to listen to and decipher the USB messages that are being sent to the keyboard. The simplest way to discover the protocol was to leverage the control application and install a USB snooper in between.
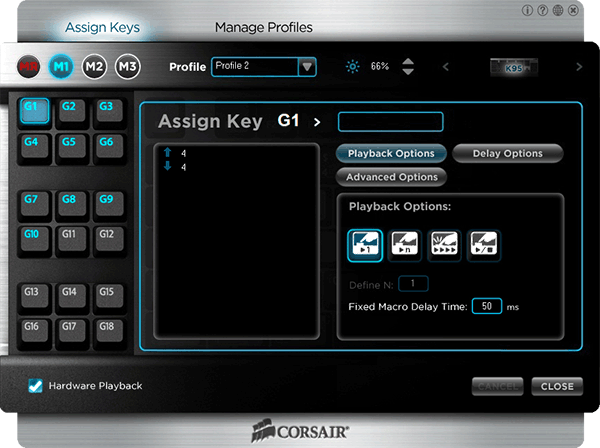
The Corsair Control application
The simplest and easiest software I could find for this was to use USBPcap and Wireshark to monitor the traffic in real-time. This shortened the time considerably as many other tools only allow you to browse log files. Also both these applications are completely FREE :)
All snooping must be done with the default Corsair drivers and programs installed. Otherwise nothing will be recorded as the application cannot communicate with our custom driver.
Using USBPcap
Run a live USBPcap session in Wireshark is really easy. The hard part is learning to use the Wireshark program and getting to grips with the USB protocol.
To start a live session:
- First run USBPcapCMD.exe once and note the device name the K95 is running under. In the example below the keyboard is under "USBPcap2"
C:\>"C:\Program Files\USBPcap\USBPcapCMD.exe"
Following filter control devices are available
1 \\.\USBPcap4
  \??\USB#ROOT_HUB#4&39169944&0#{f18a0e88-c30c-11d0-8815-00a0c906bed8}
2 \\.\USBPcap5
  \??\USB#ROOT_HUB#4&3a448a3b&0#{f18a0e88-c30c-11d0-8815-00a0c906bed8}
3 \\.\USBPcap1
  \??\USB#ROOT_HUB#4&dde9a6a&0#{f18a0e88-c30c-11d0-8815-00a0c906bed8}
    [Port 1] Xbox 360 Big Button IR Controller for Windows (Custom)
4 \\.\USBPcap6
  \??\USB#ROOT_HUB#4&1c7c1fae&0#{f18a0e88-c30c-11d0-8815-00a0c906bed8}
5 \\.\USBPcap2
  \??\USB#ROOT_HUB#4&29e1bf0e&0#{f18a0e88-c30c-11d0-8815-00a0c906bed8}
    [Port 1] USB Composite Device
      Corsair K95 Gaming Keyboard Driver
      USB Input Device
        HID-compliant consumer control device
      USB Input Device
        HID Keyboard Device
    [Port 2] USB Input Device
      HID-compliant mouse
6 \\.\USBPcap7
  \??\USB#ROOT_HUB20#4&1602901b&0#{f18a0e88-c30c-11d0-8815-00a0c906bed8}
7 \\.\USBPcap3
  \??\USB#ROOT_HUB20#4&18f82c2c&0#{f18a0e88-c30c-11d0-8815-00a0c906bed8}
    [Port 4] USB Mass Storage Device
      Portable USB Device
Run the USBPcapCMD.exe again but with the following parameters to start the live session (modifying "USBPcap2" and paths to fit your install)
"C:\Program Files\USBPcap\USBPcapCMD.exe" -d "\\.\USBPcap2" -o - | "C:\Program Files\Wireshark\Wireshark.exe" -k -i -The Wireshark application will open up and a window showing all the messages coming from and going to your device will be logged in the window. The number of messages can be a little overwhelming so the following filters can be useful (update bus_id to correspond to the USBPcapX device number)
USB URB_CONTROL only:
usb.bus_id == 2 && usb.device_address == 1 && (usb.transfer_type == 0x2 || usb.transfer_type == 0x3)

Only OUT traffic:
usb.bus_id == 2 && usb.device_address == 1 && (usb.transfer_type == 0x2 || usb.transfer_type == 0x3) && usb.endpoint_number.direction == 0
USB basics
With the USB snooping running you can start clicking the buttons in the control application and observing the URB_CONTROL OUT messages. You will quickly get a feeling for how the USB messages are constructed and which values are used (just ignore everything coming into the computer as it is mostly normal keystrokes).
For example, when clicking the increase/decrease backlighting key near the top-right in the app
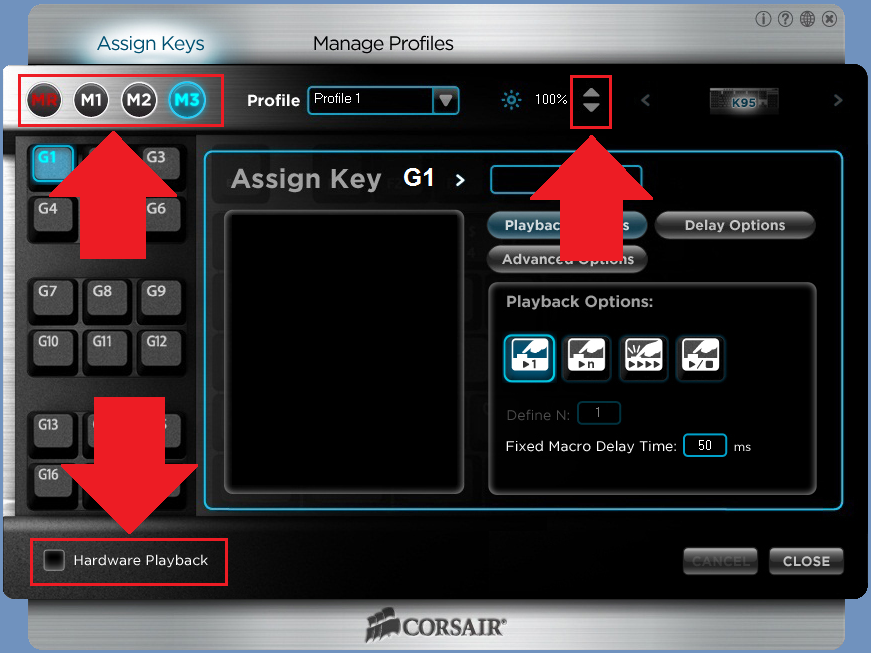
Some of the keys you can start playing around with and see the messages
I observe the following messages being sent to the keyboard from the application. I've highlighted only the relevant information:
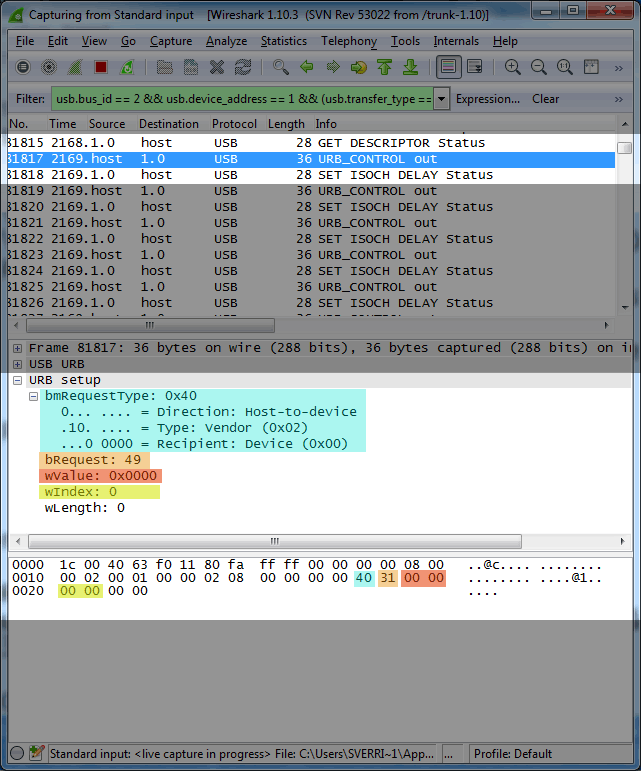
Backlighting set to off (0%)
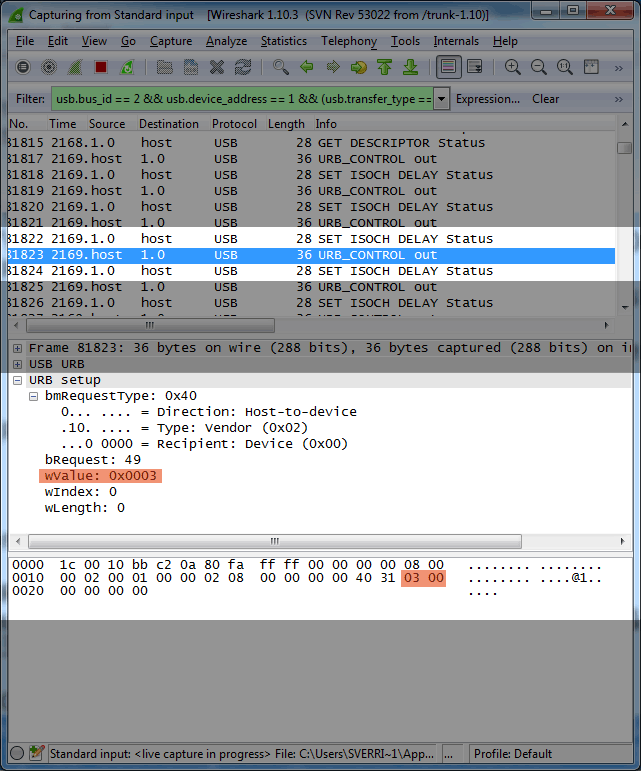
Backlighting set to full (100%)
Translating this into your own messages in WinUSB is done like so (also in the source code):
// Off

usb.ControlOut(0x40, 0x31, 0x0000, 0);

// 100% brightness

usb.ControlOut(0x40, 0x31, 0x0003, 0);
In case you want to dive deeper into the USB protocol then this guide is very useful.
Conclusion
This is pretty much it for this first introduction post into this effort. In later posts I will discuss all the USB messages that I have discovered can be sent and what each of them do.
I will also discuss a more complicated topic on how to manipulate the G-keys on the keyboard, in particular how to upload the user-defined profiles and custom key sequences to the onboard chip on the keyboard (for hardware playback).

Sverrir
Sigmundarson
Software Developer
For hire
Developer & Programmer with +15 years professional experience building software.
Seeking WFH, remoting or freelance opportunities.