Having an interactive and fully dynamic instant search box is a feature that has become ubiquitous for today's internet users.

Instant auto-complete and search query
highlighting has become the norm.
One of the big drawbacks of a completely static site is the fact that such a search box is no longer trivial to implement.
Luckily the good people at Prefixbox.com have an excellent solution to this problem which we can quite easily use.
And the best thing is that it is also completely free.
In this guide I will walk you through how to create your own search box using the prefixbox.com technology. How to generate your search data automatically when re-generating your site. And finally how to fully customize the look and feel of your personal search box.
Step 1: Creating the data
I created a Jekyll plugin in Ruby that generates the necessary data file for the Prefixbox.com services. It can be downloaded here directly.
Place this script into your /_plugins/ folder and run jekyll build or jekyll serve. The script will generate a file called prefixbox.csv in the root of your /_site/ folder. This file will be used by the prefixbox services to populate your search results.
The script can be configured in _config.yml and supports the following variables:
prefixbox:
  filename: "/prefixbox.csv" #the output filename
  exclude:  # List of files to exclude from the search results
    -atom.xml
    -feed.xml
  include: # List of files you want to explicitly include as posts
Step 2: Setting up Prefixbox
Start by signing up at www.prefixbox.com and validate your account.
Creating the suggestion list
To be able to show data in our searchbox, we need to start by creating a new Suggestion List.
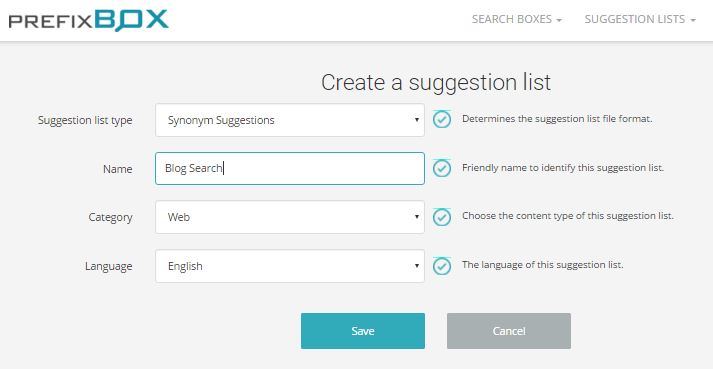
Choose "Synonym Suggestions" and give your list a name.
Suggestion lists are the data that powers your search boxes. A single search box can have one or more suggestion lists behind it and will blend and rank results from these lists as you want.
After successfully creating your list you can immediately upload the prefixbox.csv file that was created in step 1.
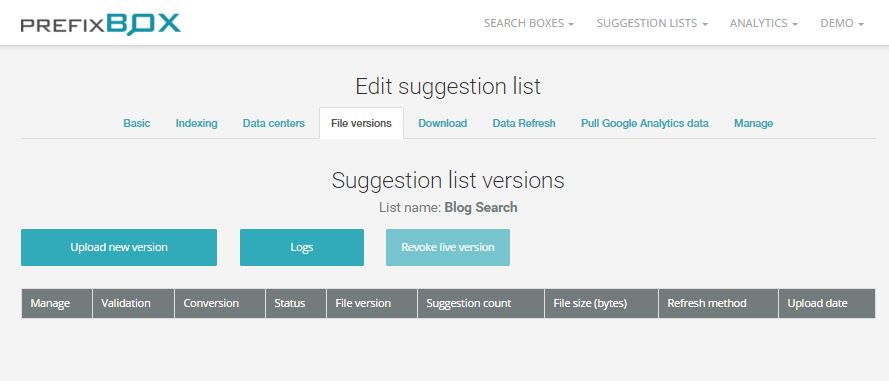
Immediately upload your prefixbox.csv to populate the suggestion list
Do this by clicking on "Upload new verson" and choosing the prefixbox.csv file, ensure that the "Set to live immediately" checkbox is ticked.
Ensure that your data file passes validation and conversion successfully before continuing on. You don't need to wait for the "In Rollout" status to complete. If any errors are reported use the buttons on the left in the "Manage" column to debug the issue.

Here a data file has been uploaded and it has passed validation and conversion successfully
The other tabs on this page hold a number of other useful settings available for the suggestion list and how the data should be utilized and matched. I would recommend coming back and play around with this when you have a working search box.
Creating the search box
Now we need to connect our suggestion list to a search box that can be interacted with on our website. Create a new search box under Search Boxes.

Pick "Site search box" and give it a name.
Before creating the search box you might need to create a new "Website". This can be done under "Manage Websites".
Click the "New Search setting" to add the suggestion list that we created above to your search box.
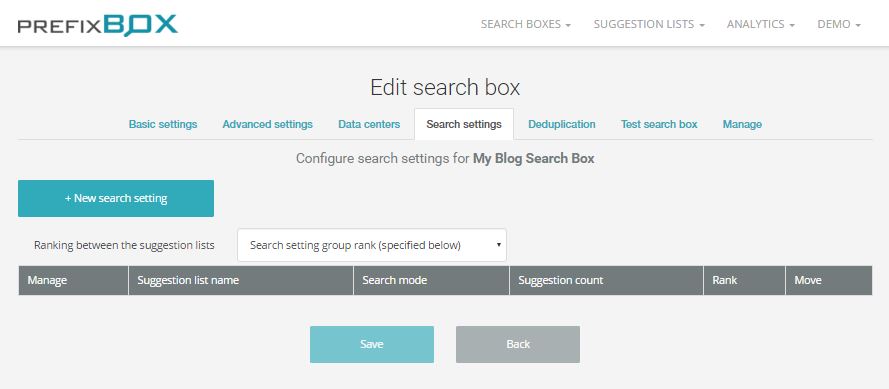
This page shows all the suggestion lists powering this search box.
Pick the suggestion list you just created. You must ensure that you provide a "Click through URL" as well.
The url does not have to exist on your website but it must contain the %suggestion% parameter.
As an example I use this URL for my blog:
https://blog.sverrirs.com/?query=%suggestion%&prefix=%pattern%
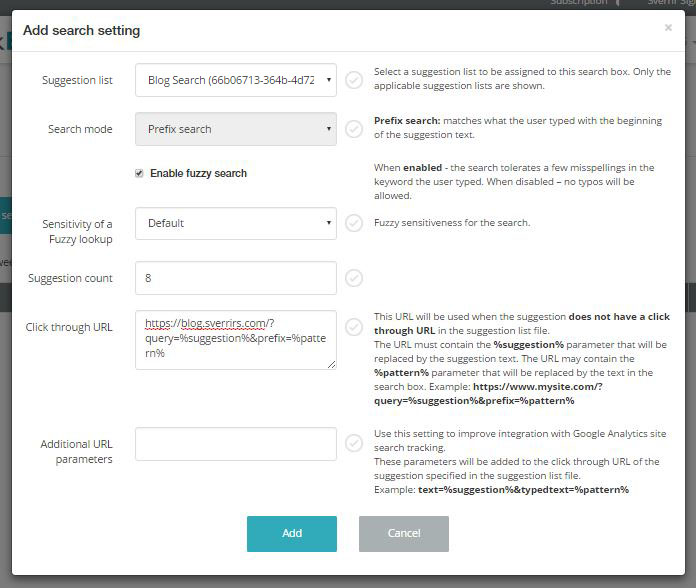
Ensure that you provide a Click through URL
After clicking "Add" remember to click "Save" as well on the website beneath, otherwise the changes you see will not be saved.

Our suggestion list has been added to the search box.
Remember to click SAVE
You can now test your search box in the "Test search box" tab. It might take a few seconds for the system to start serving data so give it a sec.
At this point you have a fully functional search box. You can get the install instructions under the "Advanced Settings" tab by clicking the button "Show Javascript plugin code".
However your search box is going to need some styling.
The Prefixbox website also has a Getting Started Guide which covers most of what I have discussed and much much more.
Step 3: Styling your search box
On the "Edit search box" page under the "Advanced Settings" tab, tick the "Use custom CSS" checkbox.
By using custom CSS you are given complete control over the CSS code that the prefixbox system sends along with its suggestions and search box control code.
Paste the following code into the text box, replacing all of its contents.
.pf-suggestion-container {
    display: none;
    z-index: 10000;
}

.pf-suggestion-container.open {
    display: block;
}

Replace the CSS with a very basic skeleton.
By replacing all of this CSS code you will be able to style the suggestions in your main website css file.
You must leave something in this CSS box. If you erase all text and leave it empty the default CSS will be applied again.
Now you are ready to style your search box as you wish. You can use the CSS that you replaced as a guide on what to replace and how to style.
I've also prepared a live demo where I style the most critical parts of the presentation. You're free to use this as a starting point as well.
Below is the CSS I used to style the live demo. The demo is also shown in the animated demo image at the top of this post.
/* Boilerplate CSS for the base <section> container */
/* Note: This code is formatted in SCSS style */
.pf-suggestion-container {
  margin: 0; padding: 0;
  padding: 5px;
  padding-top: 0px;
  top: 50px; left: 45px; /* Move it underneath and a little to the side of the input control */
  z-index: 10000;  /* Ensure it is on top */
  position: absolute;
  display: none;  /* Hidden by default */
  box-sizing: border-box;

  font-size: $font-size;
  color: $box-foreground;
  width: $dropdown-width;
  background-color: $box-background;
  border-radius: 0px 0px 5px 5px;

  /* Class for when the suggestions are shown */
  &.open{
     display: block;
  }

  /* Suggestions are organised in an unordered list */
  /* this code simply flattens it and removes excess spacing */
  ul {
    margin: 0; padding: 0;
    list-style: none;
  }

  /* Each suggestion item has this class as a top-level */
  li.pf-suggestion {
    padding: 2px 0px; /* space between suggestions */
    width: 100%;
    word-wrap: break-word; /* break long words */
    white-space: normal;   /* allow long text to wrap to second line */

    /* This is the container for each suggestion text */
    /* I set the default color to the requested highlight color. */
    /* This will act as a highlight the matching prefix */
    .pf-suggestion-body-text1 {
      color: $box-foreground-highlight;
    }

    /* This color will mask the rest of the suggestion text */
    /* meaning everything except the matching prefix. */
    .pf-highlight {
      color: $box-foreground;
    }

    /* Each suggestion comes with an optional image and a category */
    /* tag, for this demo I am not interested in these so just hide them */
    .pf-suggestion-right,
    .pf-suggestion-left {
      display: none;
    }
  }

  /* When the user selects an item in the auto-complete list */
  /* I want the selected item to get a white highlighting */
  /* and all other highlighting should be removed */
  .pf-selected {
    color: white!important;

    .pf-suggestion-body-text1{
      color: inherit!important;
    }

    .pf-highlight{
      color: inherit!important;
    }
  }
}
Automatic Updates
If you upload the prefixbox.csv file to your webserver along with the rest of your static website you can configure the Prefixbox system to automatically download new versions of your data.
Do this by opening the "Download" tab in the relevant suggestion list page.
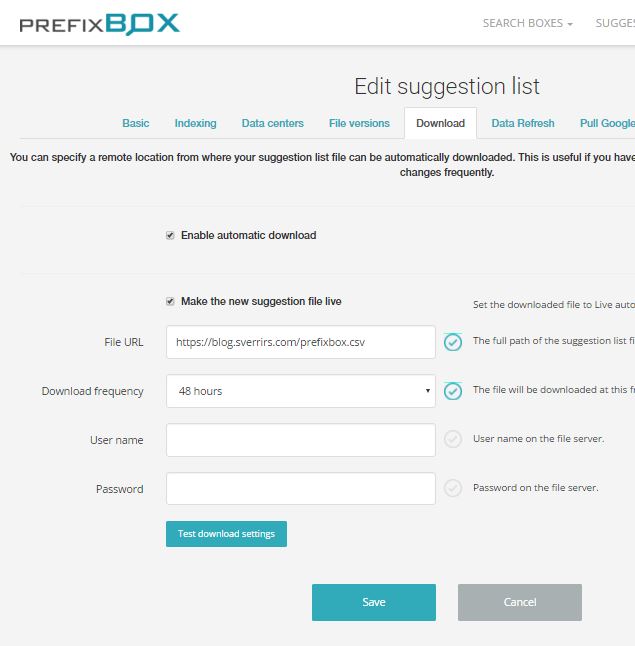
Enable automatic downloading and specify the download URL.
Tick both the "Enable automatic download" and "Make the new suggestion file live". Then specify the URL for the prefixbox.csv file and choose the download frequency. I usually set it to the maximum, 48 hours, as I am unlikely to post more frequently on my site.
Click SAVE after testing your download settings and you are good to go.

Sverrir
Sigmundarson
Software Developer
For hire
Developer & Programmer with +15 years professional experience building software.
Seeking WFH, remoting or freelance opportunities.